Page 62 - TesaKatalogen
P. 62

DIN 863 T3                                D i g ital M i c r o meters
(Style D7)
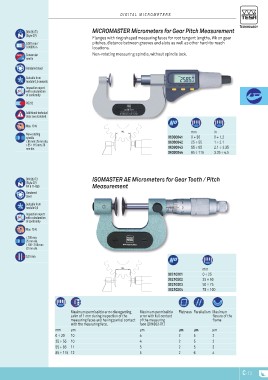
0,001 mm /            MICROMASTER Micrometers for Gear Pitch Measurement
0.00005 in
Conversion            Flanges with ring-shaped measuring faces for root tangent lengths, Wk on gear
mm/in                 pitches, distance between grooves and slots as well as other hard-to-reach
                      locations. 
Hardened steel        Non-rotating measuring spindle, without spindle lock.

Suitable from         WK mm in
module 0,5 onwards
Inspection report                                                            06030041 0 ÷ 30                          0 ÷ 1.2
with a declaration
of conformity                                                                06030042 25 ÷ 55                         1 ÷ 2.1
RS232
                                                                             06030043 55 ÷ 85                         2.1 ÷ 3.35
Additional technical
data: see standard.                                                          06030044 85 ÷ 115                        3.35 ÷ 4.5

Max. 10 N
Non-rotating
spindle
≤ 85 mm: 25 mm dia.
> 85 ≤ 115 mm: 30
mm dia.

DIN 863 T3            ISOMASTER AE Micrometers for Gear Tooth / Pitch
(Style D7)            Measurement
NF E 11-090
Hardened
steel
Suitable from
module 0,6
Inspection report
with a declaration
of conformity

Max. 10 N
≤ 100 mm:
25 mm dia.
> 100 ≤ 150 mm:
32 mm dia

0,01 mm

                      WK mm

                                                                             00210201                        0 ÷ 25

                                                                             00210202                        25 ÷ 50

                                                                             00210203                        50 ÷ 75

                                                                             00210204                        75 ÷ 100

                                 Maximum permissible error disregarding      Maximum permissible      Flatness Parallelism Maximum
                                 a rim of 1 mm during inspection of the      error with full contact                           flexure of the
                                 measuring faces and having partial contact  of the measuring                                  frame
                                 with the measuring face.                    face (DIN863-T1)                                   
                      mm µm                                                  µm
                      0 ÷ 30 10                                              4                        µm µm          µm
                      25 ÷ 55 10                                             4
                      55 ÷ 85 11                                             5                        25             2
                      85 ÷ 115 12                                            5
                                                                                                      25             2

                                                                                                      25             3

                                                                                                      26             4

                                                                                                                                               C-13
   57   58   59   60   61   62   63   64   65   66   67