Page 103 - TesaKatalogen
P. 103
D i a l g a u ges – E l ec t r o n i c a n d A n a l og u e

EASY-TO-USE AND VERSATILE

For more than 50 years we have been producing and distributing a wide range of easy-to-use and
versatile dial gauges. Our experience allows us to offer a wide choice of different models.
–– Electronic indicators with combined analogue/digital display using the most up-to-date technology.
–– Mechanical dial gauges equipped with high-precision movements and double-action shockproof

   mechanisms. Measuring spans up to 100 mm.

Choice of Dial Gauge or Electronic Indicator

–– Digital indication provides error-free reading of the measured value. There is no need to read frac-
   tions of scale divisions.

–– Analogue indication offers the advantage of being able to smoothly adjust the increase or de-
   crease of the dimension to be measured on the workpiece. This type of indication is best suited for
   dynamic measurements such as determining axial and radial runout errors.

–– Electronic indicators provide many additional functions compared to the mechanical models. For
   more information, refer to the section on electronic indicators.

–– The inspection of axial and radial runout errors frequently requires the use of instruments with
   the lowest hysteresis characteristic. Our electronic indicators, precision dial gauges and dial test
   indicators meet this requirement.

–– In order to significantly reduce the effect of systematic errors, it is recommended to carry out
   comparative measurements. Only deviations from the nominal dimension will be displayed. High
   precision, small range electronic indicators are the ideal instruments for these types of measure-
   ments.

–– These same instruments also enable avoiding major errors in reading millimetres.

Standards and Definitions

The international ISO 463:2006 standard replaces national standards dealing with mechanical dial
gauges. All the same, new definitions and standard requirements pertaining to measuring proce-
dures, although valid, imply changes in design and metrological characteristics, which cannot be
entirely indicated in this catalogue. This standard, is defined in the matrix "Product Specification
(GPS) – dimensional measuring instruments". It only defines the requirements for the most important
characteristics.
Therefore, all tolerance limits indicated in this catalogue which refer to metrological characteristics
are based on our own internal standards.

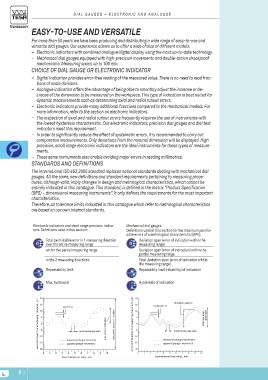
Electronic indicators and short range precision indica-                                     Mechanical dial gauges.
tors. Definitions used in this section:                                                     Definitions used in this section for the maximum permis-
                                                                                            sible errors of a metrological characteristic (MPE):
         Total permissible error in 1 measuring direction
         over the entire measuring range                                                             Deviation span (error of indication within the
         within the partial measuring range                                                          measuring range)
         in the 2 measuring directions                                                               Deviation span (error of indication) within the
         Repeatability limit                                                                         partial measuring range
                                                                                                     Total deviation span (error of indication within
         Max. hysteresis                                                                             the measuring range)
                                                                                                     Repatability limit (reliability) of indication

                                                                                                     Hysteresis of indication

error (of indication) of a measuring instrument, µm20
                                                                                            max. error of indication15
                                                                                                       max. perm. errors of indication
                                                            hysteresis
                                                                                                                      error (of indication) of a measuring instrument, µm10
                                                                                                                                                                                                               total deviation
                                                                                                                                                                                                                  span fges5
                           0                                                                 20
                           -5 local measuring span                                                                                           deviation span fe
                         -10
                                                                                            15 hysteresis fu
                                                                 downward plunger movement   10
                         -15 uppward plunger movement
                         -20                                                                  5

                              0 1 2 3 4 5 6 7 8 9 10                                          0
                                                          (conventional) true value, mm
                                                                                             -5 local measuring span
F-2 www.tesagroup.com
                                                                                            -10
                                                                                                                               downward plunger movement

                                                                                            -15 uppward plunger movement

                                                                                            -20
                                                                                                0 1 2 3 4 5 6 7 8 9 10
                                                                                                                      (conventional) true value, mm

