Page 108 - TesaKatalogen
P. 108
According                                 D i a l g a u ges – E l ec t r o n i c
to selected
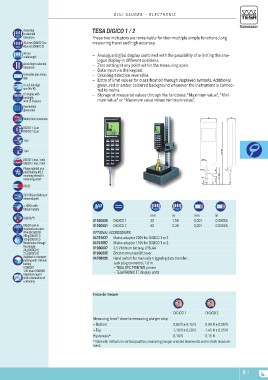
tolerances                TESA DIGICO 1 / 2
30,4 mm (DIGICO 1) or
60,4 mm (DIGICO 2)        These two indicators are remarkable for their multiple simple functions, long
40 mm                     measuring travel and high accuracy.
scale length              –– Analogue/digital display combined with the possibility of orienting the ana-
According to selected
tolerances                   logue display in different positions.
6 decades plus minus      –– Zero setting at any point within the measuring span.
sign                      –– Data input via the keypad.
9 x 4,5 mm digit          –– Counting direction reversible.
size (H x W)              –– Entry of limit values for classification through displayed symbols. Additional
LC display with
backlight,                   green, red or amber coloured background whenever the instrument is connec-
with 25 divisions            ted to mains.
Incremental               –– Storage of measured values through the functions: "Maximum value", "Mini-
glass scale                  mum value" or "Maximum value minus minimum value".

Metric/inch conversion                                                                                                                                                                                                                                                           49 29

DIGICO 1: 2 μm                                                                                                                               199 / 233
DIGICO 2: 3 μm
                                                                                          18/176                                                        9
1 μm                                                                                   ø8 h6                               30 / 60 20
                                                                                                                                  57 / 86,5
1 μm                                                                                     ø4,5

DIGICO 1: max. 1 m/s      01930000 DIGICO 1  mm in                                     mm              in
DIGICO 2: max. 2 m/s      01930001 DIGICO 2  30 1.18                                   0,001           0.00005
Plunger guided on a                          60 3.36                                   0,001           0.00005
plain bearing M2,5
mounting thread fo        Optional accessories:
measuring insert.         04761037 Mains adaptor 230V for DIGICO 1 or 2
RS232                     04761057 Mains adaptor 110V for DIGICO 1 or 2
                          01960007 3.5 V lithium battery, LR6, AA
3,6 V lithium battery or  01960005 Bottom mounted lift lever
mains adapter             04768000 Hand switch for manually triggering data transfer.
≈ 1000 h with
lithium battery                          Jack plug connector, 1,8 m
                                         – TESA SPC PRINTER printer
0,002%/°C                                – TESATRONIC TT display units
DIGICO case in
standard execution:
IP54 (IEC 60529)
290 g (DIGICO 1)
310 g (DIGICO 2)
Moved mass through
the plunger:
28 g (DIGICO 1)
27 g (DIGICO 2)
Supplied in transport
packing with 1 lithium
battery
01960007
1 lift lever 01960005
Inspection report
with a declaration of
conformity

                          Force de mesure

                                                                            DIGICO 1           DIGICO 2

                          Measuring force* close to measuring plunger stop

                          – Bottom                                          0.85 N ± 0.15 N 0.90 N ± 0.20 N

                          – Top                                             1.10 N ± 0.20 N 1.45 N ± 0.25 N

                          Hysteresis*                                       0.10 N             0.15 N

                          * Valid with indicator in vertical position, measuring plunger oriented downwards and in static measure-
                          ment.

                                                                                                                                                                                                                                                                                        F-7

