Page 134 - TesaKatalogen
P. 134

DIN 2270                                                                                               TESATAST D i a l T e s t I n d i c a t o r s
NF E 11-053
                                                                                           TESATAST Dial Test Indicators

                                                                                           These lever-type dial test indicators are especially intended for use on the shop
                                                                                           floor or in the inspection room – Ideally suited for comparative measurements on
                                                                                           a surface plate, for instance – Determine form, shape and position deviations as
                                                                                           well as axial and runout errors.
                                                                                           –– Bidirectional measuring with automatic reversal inside the movement.
                                                                                           –– Continuous clockwise pointer rotation providing error-free reading.
                                                                                           –– Insensitive to magnetic fields.
                                                                                           –– Jewelled movement with 7 rubies.
                                                                                           –– Ball-bearing lever system. Measuring insert swivelling through to 240°.
                                                                                           –– Very low measuring force.
                                                                                           –– Exceptionally robust with full-metal construction.

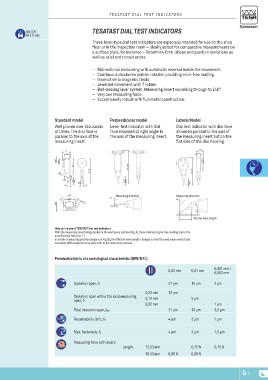
             Standard model                                                                Perpendicular model                       Lateral Model
             Well proven over thousands                                                    Lever test indicator with dial            Dial test indicator with dial face
             of times. The dial face is                                                    face mounted at right angle to            mounted parallel to the axis of
             parallel to the axis of the                                                   the axis of the measuring insert.         the measuring insert but on the
             measuring insert.                                                                                                       flat side of the dial housing.

                   24                                                                                                                                                          17,4
                     15                                                                                                                                                      10,1

             ø38,4                                                                         77 / 101                                              70 / 94
                   ø28,5
                                                11,8 4513                                  11,8                                         11,8
                                                   35,88,3                                    35,8                                         35,8
                                                                                  70 / 94
                                    ø2
                                                  7,6

                                    8,54                                                        Measuring direction                  Measuring direction
                                    6,4 ø 1,5                                                                                        B
                                                                                           A
                                                                                                                                                            α
             1,65
                                                                                                                                                     Shorter lever length

             Note on the use of TESATAST dial test indicators
             With the measuring insert lying parallel to the workpiece surface (Fig. A), these indicators give true reading due to the
             amplification factor to 1:1.
             In another measuring position (angle α in Fig. B), the effective lever length changes so that the read value needs to be
             corrected. With respect to this, also refer to the instruction manual.

             Permissible limits of a metrological characteristic (MPE/MPL)

                                                                                                                               0,02 mm           0,01 mm  0,001 mm /
                                                                                                                                                 10 µm    0,002 mm
                                    Deviation span, fe                                                               0,20 mm   27 µm                      2 µm
                                                                                                                     0,10 mm   12 µm             5 µm
                                    Deviation span within the local measuring                                        0,02 mm                     13 µm    1 µm
                                    span, ft                                                                                   31 µm             3 µm     3,5 µm
                                    Total deviation span, fges                                                                 4 µm              3 µm     1 µm
                                    Repeatability limit, fw                                                                                               1,5 µm
                                                                                                                                                 0,15 N
                                    Max. hysteresis, fu                                                                        4 µm              0,06 N   0,15 N
                                    Measuring force with insert:
                                    			Length                                                                        12,53 mm
                                                                                                                     36,53 mm
                                                                                                                               0,06 N

                                                                                                                                                                                     G-3
   129   130   131   132   133   134   135   136   137   138   139