Page 138 - TesaKatalogen
P. 138

INTERAPI D 3 1 2 D i a l T e s t I n d i c a t o r s

                  INTERAPID 312 lever dial test indicators

                  INTERAPID 312 Dial Test Indicators very large measuring span – Ideal for inspec-
                  ting all significant size variations, e.g. on the surface plate – Measures position,
                  form and shape errors.
                  –– Safe reading thanks to secondary pointer totalling the number of revolutions

                     made by the main pointer.
                  –– Bidirectional measuring with automatic reversal within the movement.
                  –– Pointer rotation direction is always constant due to automatic reversal effect.
                  –– Jewelled movement with rubies.
                  –– Ball-bearing lever system. Measuring insert swivelling through 210°.
                  –– Particularly robust due to full-metal construction.
                  –– Monobloc housing with mounting through dovetail clamping and a Ø 4 mm

                     swivelling shank.

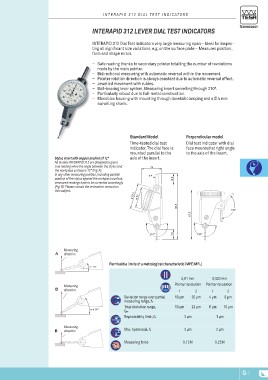
                                                       Standard Model                            Perpendicular model
                                                       Time-tested dial test                     Dial test indicator with dial
                                                       indicator. The dial face is               face mounted at right angle
                                                       mounted parallel to the                   to the axis of the insert.
                                                       axis of the insert.
Stylus insert with angular position of 12°
All models INTERAPID 312 are designed to give a                                29
true reading when the angle between the stylus and
the workpiece surface is 12° (Fig. A).                                        ø4
In any other measuring position, including parallel                                  16,5
position of the stylus against the workpiece surface,  ø 37,5                            96,5
measured readings have to be corrected accordingly          ø 30
(Fig. B). Please consult the instruction manual on
this subject.

                                                                                                 67,5

                                                                                     ~16

       Measuring  Permissible limits of a metrological characteristic (MPE/MPL)
A direction
                                                                                               0,01 mm             0,002 mm
       Measuring                                                                          Pointer revolution  Pointer revolution
B direction
                                                       Deviation range over partial         1            2        12
       Measuring                                       measuring range, fe                10 µm        20 µm    4 µm 8 µm
B direction                                            Total deviation range,
                                                       fges                               13 µm 23 µm 6 µm 10 µm
                                                       Repeatability limit, fw
                                                                                                 3 µm 1 µm

                                                       Max. hysteresis, fu                       3 µm 2 µm

                                                       Measuring force                         0,12 N         0,25 N

                                                                                                                                  G-7
   133   134   135   136   137   138   139   140   141   142   143