Page 223 - TesaKatalogen
P. 223
S urfa c e R oug h ness T esting

     Measuring span, μm       06930011
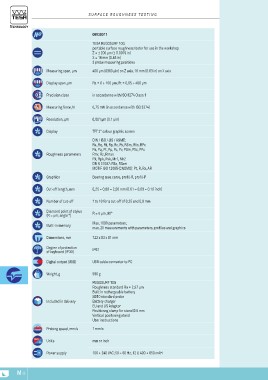
     Display span, μm         TESA RUGOSURF 10G
     Precision class          portable surface roughness tester for use in the workshop
     Measuring force, N       Z = ± 200 μm (± 0.0079 in)
     Resolution, µm           X = 16 mm (0.63 in)
     Display                  3 probe measuring positions
                              400 μm (6300 μin) on Z axis, 16 mm (0.63 in) on X axis
     Roughness parameters     Ra = 0 ÷ 100 μm; Rt = 0,05 ÷ 400 μm
                              in accordance with ISO 3274 Class 1
     Graphics                 0,75 mN (in accordance with ISO 3274)
     Cut-off length, mm       0,001 μm (0.1 μin)
     Number of cut-off        TFT 2" colour graphic screen
     Diamond point of stylus  DIN / ISO / JIS / ASME:
     (R = μm; angle °)        Ra, Rq, Rt, Rp, Rc, Rv, RSm, Rδc, RPc
     Built-in memory          Pa, Pq, Pt, Pp, Pc, Pv, PSm, Pδc, PPc
     Dimensions, mm           Rmr, Rz, Rmax
     Degree of protection     Rk, Rpk, Rvk, Mr1, Mr2
     of keyboard (IP XX)      DB N 31007: R3z, R3zm
     Digital output (USB)     MOTIF ISO 12085 (CNOMO): Pt, R, Rx, AR
     Weight, g                Bearing area curve, profil-R, profil-P
                              0,25 – 0,80 – 2,50 mm (0.01 – 0.03 – 0.10 inch)
     Included in delivery     1 to 10 for a cut-off of 0,25 and 0,8 mm
                              R = 5 μm, 90°
     Probing speed, mm/s      Max. 1000 parameters;
     Units                    max. 20 measurements with parameters, profiles and graphics
     Power supply             122 x 53 x 81 mm
                              IP67
                              USB cable connector to PC
                              590 g
                              RUGOSURF 10G
                              Roughness standard Ra = 2,97 μm
                              Built in rechargeable battery
                              SB10 standard probe
                              Battery charger
                              EU and US Adaptor
                              Positionng clamp for stand Ø 8 mm
                              Vertical positoning stand
                              User instructions
                              1 mm/s
                              mm or inch
                              100 ÷ 240 VAC; 50 ÷ 60 Hz, 12 V, 400 ÷ 650 mAH

M-8

