Page 257 - TesaKatalogen
P. 257
H ei g ht Ga u g es                                       Factory standard

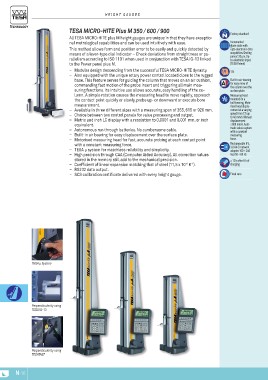
                                     TESA MICRO-HITE Plus M 350 / 600 / 900                                             Incremental
                                                                                                                         glass scale with
                                     All TESA MICRO-HITE plus M height gauges are unique in that they have exceptio-     opto-electronic data
                                     nal metrological capabilities and can be used intuitively with ease.                acquisition. Grating
                                     This method allows form and position error to be easily and quickly detected by     period: 20 μm. Op-
                                     means of a lever-type dial indicator – Check deviations from straightness or pa-    to-electronic input
                                     rallelism according to ISO 1101 when used in conjunction with TESA IG-13 linked     (TESA Patent)
                                     to the Power panel plus M.
                                     –– Modular design descending from the successful TESA MICRO-HITE dynasty.           1N
                                     –– Also equipped with the unique rotary power control located close to the rugged
                                                                                                                         Built-in air-bearing
                                        base. This feature serves for guiding the column that moves on an air cushion,   for easy move of
                                        commanding fast motion of the probe insert and triggering all main mea-          the column over the
                                        suring functions. Its intuitive use allows accurate, easy handling of the co-    surface plate
                                        lumn. A simple rotation causes the measuring head to move rapidly, approach      Measuring head
                                        the contact point quickly or slowly, probe up- or downward or execute bore       mounted on a
                                        measurement.                                                                    ball-bearing. Moto-
                                     –– Available in three different sizes with a measuring span of 365, 615 or 920 mm.  rised head displa-
                                     –– Choice between two control panels for value processing and output.               cement at a varying
                                     –– Metric and inch LC display with a resolution to 0,0001 and 0,001 mm, or inch     speed from 7,5 up
                                        equivalent.                                                                      to 40 mm/s. Manual
                                     –– Autonomous run through batteries. No cumbersome cable.                           displacement:
                                     –– Built-in air bearing for easy displacement over the surface plate.               ≤ 600 mm/s. Auto-
                                     –– Motorised measuring head for fast, accurate probing at each contact point        matic value capture
                                        with a constant measuring force.                                                 with a constant
                                     –– TESA μ system for matchless reliability and simplicity.                          measuring
                                     –– High precision through CAA (Computer Aided Accuracy). All correction values      force.
                                        stored in the memory still add to the mechanical precision.                      Rechargeable 6 V,
                                     –– Coefficient of linear expansion matching that of steel (11,5 x 10⁻⁶ K-1).        3.0 Ah or network
                                     –– RS232 data output.                                                               adapter 100 ÷ 240
                                     –– SCS calibration certificate delivered with every height gauge.                   Vac/50 ÷ 60 Hz
                                                                                                                         ≈ 12 h after 8 h of
                                                                                                                         charging

                                                                                                                         Fixed zero

             TESA µ System

             Perpendicularity using
             TESA IG-13

             Perpendicularity using
             TESATAST

N-16

