Page 278 - TesaKatalogen
P. 278
E le c t r o n i c L e n gth M easu r i n g E q uipme n t

Multiple application possibilities
TESA probes have been designed for applications for use with instruments for internal and external
measurements, measuring supports or special measuring systems. For such applications, different
probe executions can be supplied such as probes with an axial measuring bolt or parallel guides, re-
fer also to angle lever probes. In addition, there are also special executions developed for multi-gau-
ging inspection fixtures or ‘in-process’ inspection stations, which enable an economy in the number
of components needed. Apart from a few exceptions, the measuring operations executed are always
comparative measurements with reference to a standard such as a gauge block, a setting ring or any
other component that can be used as a master.
The measurements are extremely accurate. Bias error influence is negligible compared to the budget
for measuring uncertainty given the fact that the comparison is being established between two
almost practically equal values
Random errors also lose their influence in a procedure where the display setting is made under the
same conditions as the subsequent probing measurements
TESA measuring instruments are equipped with an analogue and/or digital display, depending on the
model.

Internal processing of measured values
Depending on the application, the electrical signals are processed in different ways within the ins-
trument.
Mathematical Data Processing
The signals can be processed with positive polarity sign as well as negative polarity sign. The use of
a single probe enables single measurement of internal or external dimensions while the combination
of the signals of two probes produces either a "sum measurement" or a "difference measurement".

Value Storage
The storage of measured values in the memory ensures the reliability of dynamic measuring cycles.
The characteristic values are the two minimum and maximum values or the difference between the
smallest and largest value acquired while measuring form or position errors.
Classification of Values
The measured values can be classified after the entering of limit deviations. In this case, the control
signals can be used by an external peripheral unit.

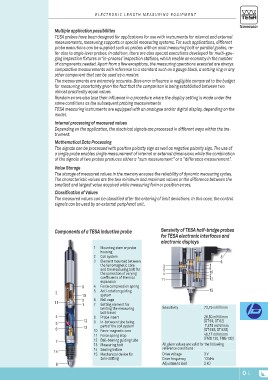
Components of a TESA inductive probe    Sensivity of TESA half-bridge probes
                                        for TESA electronic interfaces and
                                        electronic displays

        1 	 Mounting stem or probe
        	 housing
        2 	 Coil system
        3 	 Element mounted between                              8

        	 the ferromagnetic core        3                1       6
                                        5                9
        	 and the measuring bolt for    4                10
        	 the correction of varying                      2
        	 coefficients of thermal
        	 expansion                     11 12

    9 4 	 Force compression spring                       15
            5 	 Anti-rotation guiding
2   10 	 system

11  3 6 	 Ball cage                     Sensitivity      73,75 mV/V/mm
    1 7 	 Setting element for
        	 limiting the measuring
        	 bolt travel
4 8 	Probe insert                                        29,50 mV/V/mm
    12 9 	 In-between tube being                         (GT 61, GT 62)
5       	 part of the coil system                        7,375 mV/V/mm
6   13  10 	 Ferro-magnetic core                         (GT 61S, GT 62S)
                                                         49,17 mV/V/mm
        11 	 Force spring stop                           (FMS 130, FMS 132)
        12 	 Ball-bearing guiding tube
7       13 	 Measuring bolt             All given values are valid for the following
                                        reference conditions :
14      14 	 Sealing bellow
        15 	 Mechanical device for      Drive voltage    3V
        	 zero-setting                  Drive frequency  13 kHz
                                        Adjustment load  2 kΩ
8

                                                                                                         O-5

