Page 303 - TesaKatalogen
P. 303

U S B , D C , W i r eless P r obes                                                                              DIN 32876
                                                                                                                                                     Part 1
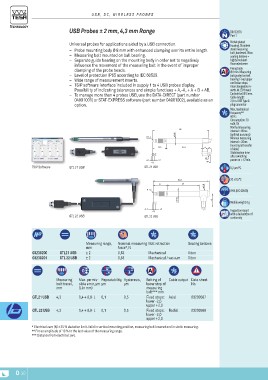
                     USB Probes ± 2 mm, 4,3 mm Range                                                                                                Nickel-plated
                                                                                                                                                     housing. Stainless
                     Universal probes for applications aided by a USB connection.                                                                    steel measuring
                     –– Probe mounting body Ø 8 mm with enhanced clamping over its entire length.                                                    bolt, hardened. Viton
                     –– Measuring bolt mounted on ball bearing.                                                                                      sealing bellows =
                     –– Separate guide bearing on the mounting body in order not to negatively                                                       highly resistant
                                                                                                                                                     fluoroelastomer
                        influence the movement of the measuring bolt in the event of improper                                                        Fixing body
                        clamping of the probe beads.                                                                                                 Ø 8 mm. Measuring
                     –– Level of protection IP65 according to IEC 60529.                                                                             bolt guided on ball
                     –– Wide range of measurement inserts.                                                                                           bearing. Fixed upper
                     –– TSIP software interface included in supply 1 to 4 USB probes display.                                                        and lower stops.
                        Possibility of indicating tolerances and simple functions + A,-A, + A + B + AB.                                              Interchangeable in-
                     –– To manage more than 4 probes USB, use the DATA-DIRECT (part number                                                           serts. M 2,5 thread.
                        04981001) or STAT-EXPRESS software (part number 04981002), available as an                                                   Carbide ball Ø 3 mm.
                        option.                                                                                                                      Cable length:
                                                                                                                                                     2,9 m. USB Type A
                                                                            R 1,5                   ø 8h6   92                                       plug connector
                                                                                              20,5               61,5                                Max. mechanical
                                                                                                                                            98       frequency**
                                                                            -2,1           +3              82,5                                      60 Hz.
                                                                                     0                           47                          ø3      Consumption: 70
                                                                                                                                               99    mAh, 5V
      TSIP Software  GTL 21 USB                                             GTL 21 USB                                                               Normal measuring
                     GTL 22 USB                                                                                                           GTL 211    interval = 80ms
                                                                                                                                                     (optimal accuracy)
                                                                                           21                                             ø 9,6      Minimal measuring
                                                                                                                                                     interval = 20ms
                                                                            R 1,5                                                                    (most rapid transfer
                                                                                                                                                     of data)
                                                                                                           ø 8h6                                 19  Stabilisation time
                                                                                                                                                     after switching
                                                                            -2,1           +3                                                        power on = 12 min.
                                                                                        0                                                            0,2 μm/°C

                                                                            GTL 22 USB                                                               20 ± 0,5°C

                                                                                                                                                     IP65 (IEC 60529)

                                                                                                                                                     Mobile weight: 6 g
                                                                                                                                                     Inspection report
                                                                                                                                                     with a declaration of
                                                                                                                                                     conformity

      03230200       GTL21 USB     Measuring range,    Nominal measuring Bolt retraction                               Sealing bellows
      03230201       GTL 22 USB    mm                  force*, N
                                   ±2                  0,63 Mechanical                                                 Viton
                                   ±2                  0,63 Mechanical / vacuum                                        Viton

                     Measuring     Max. permis- Repeatability, Hysteresis,  Setting of Cable output Data sheet
                     bolt travel,  sible error, μm μm  μm                   lower stop of                              No.
                     mm            (L in mm)                                measuring
                     4,3                                                    bolt*** mm

      GTL21 USB      4,3           0,4 + 0,8· L 0,1    0,5                  Fixed stops: Axial                         03200587
      GTL 22 USB                                                            lower -2,0
                                                                            upper +2,0

                                   0,4 + 0,8· L 0,1    0,5                  Fixed stops: Radial                        03200588
                                                                            lower -2,0
                                                                            upper +2,0

      * Electrical zero (N) ± 25 % deviation limit. Valid in vertical mounting position, measuring bolt lowered and in static measuring.
      ** For an amplitude of 10 % to the last value of the measuring range.
      *** Distance from electrical zero.

O-30
   298   299   300   301   302   303   304   305   306   307   308