Page 12 - TesaKatalogen
P. 12
What is known...
Traceability
to National Standards
All measuring equipment consistently used on our production site is traceable
to national standards or reference fixtures through our quality management
system.
Traceability is established by recalibration at regular intervals with docum entary
evidence as specified in the standards.
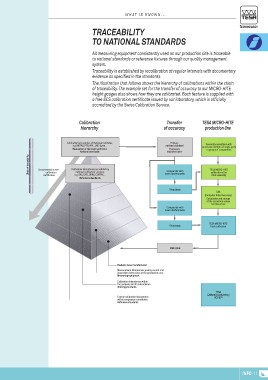
The illustration that follows shows the hierarchy of calibrations within the chain
of traceability. The example set for the transfer of accuracy to our MICRO-HITE
height gauges also shows how they are calibrated. Each f eature is supplied with
a free SCS calibration certificate issued by our laboratory, which is officially
accredited by the Swiss Calibration Service.
Calibration Transfer TESA MICRO-HITE
hierarchy of accuracy prFoedurtcitgiionnglsinlienie
Calibration laboratories of National Institutes, Primary Assembly operations with
e.g. METAS, PTB, NPL, LNE-Syrte... national standard successive controls of single parts
Realization of the metre definition
National standards Frequency or groups of components
stabilised laser
Chain of traceability Documentation over Calibration laboratories accredited by Comparator with TESA MICRO-HITE
calibration national calibration services, laser interferometer calibration after
e.g. SAS, DKD, UKAS, COFRAC... final assembly
certificates Reference standards Step gauge
Comparator with CAA
laser interferometer (Computer Aided Accuracy)
Step gauge Calculation and storage
of the correction values
for bias errors
TESA MICRO-HITE
final calibration
End user TESA
Calibration laboratory
Products to be manufactured
Measurement laboratories, quality control and SCS 001
inspection rooms close to the production area
Measuring equipment
Calibration laboratories within
the company and its subsidiaries
Working standards
Central calibration laboratories
within companies or institutes
Reference standards
INFO-11

